3.04.2014

March Goal: Penny Lane Quilt

I don't know about you, but I have a ton of projects that I have started but not yet finished. My good friend Melissa over at Sewbittersweet Designs is hosting this fun linky party she calls a lovely year of finishes where each month you set a goal to finish up one of those pesky projects that are sitting around begging to be finished. 

Anyway for this month my goal is to finally piece my penny lane star quilt top. It's a quilt featuring this awesome paper pieced block from 627 handworks that are in jewel tones with low volume backgrounds. My lovely friends that are part of the inspire circle for the do.good.stitches bee were kind enough to send in some of these beautiful blocks.


I'd love to sandwich it and quilt it, but I'm trying to be realistic given the fact that I have midterms and papers due this month, so the goal is really just to assemble the quilt top.  I have a few more star blocks to paper piece and then I can finally get this top pieced! 


What projects are on your to do list for the month?

2.27.2014

WIP: City Sampler Quilt


I've been working on a quilt from Tula Pink's City Sampler Book for about six months now. Awhile back I made a mini quilt featuring some of my favorite blocks from the book, but I decided I needed to make an entire quilt. On somewhat of a whim I purchased a half eighth bundle of full moon lagoon and have decided to pair it with solids for my blocks.


This is the first time I've made a project out of one fabric line instead of mixing and matching some of my favorite individual fabrics. So far I'm liking how it is turning out - and I'm loving the fact that this line contains almost all of the colors of the rainbow.

As of today I have 36 blocks done.

I figure that's not that bad considering the only time I have to work on it is during the monthly Tula Pink sit and sew meetings at my local quilt shop. I am pretty excited with my progress and am hoping that with my new goal to focus on what makes me happy I'll have more time to devote to this project...who knows maybe I'll finish it up before the end of 2014!

Have you made a city sampler quilt? Or do you have a project that has/will take you forever and a day to complete? If so perhaps you should join me as I try to finish it up this year - finishing one quilt in a year seems like a totally obtainable goal, and I know you (we) can do it! Who knows, if enough people express interest perhaps I'll even offer a prize of some sort.

2.18.2014

Sew Sew Modern 4

I participated for the first time in the Sew Sew Modern Swap on flickr. I really liked the idea of putting together a nice package of goodies for someone else  - especially because who doesn't like getting packages in the mail? When I got assigned my partner, I felt like I hit the jackpot because Shanna is super awesome and I knew immediately what I wanted to make for her. She finally got my package the other day so I can show you guys what I made.

For my large item I made a Supertote with 2 quilted patchwork pockets featuring some of her favorite designers in a deep pink, purple, and mustard yellow color scheme. The lining is a yellow Tula Pink print, and I used Kona burgundy for the piping & interior pockets. I really enjoyed making this bag and made a few alterations to the pattern, including adding some stiffer interfacing so it would be able to hold a lot more stuff, and keep it's shape when standing up.


For the smaller item I created a linen zip pouch that I stuffed full of scraps from the project.


Of course, I couldn't help but add a few other small items to round out my package, including a copy of one of my favorite quilting books by Angela Walters, some fun notecards, and the best chapstick known to mankind. In the end I wished I could have kept the bag (and entire package, really) for myself, but that's a sign of a good swap package, I think.


2.17.2014

Happy 2014 (a few months late)


Happy February, belated Valentine's Day, belated New Years, Christmas, etc.

Life around here has been hectic and I've been forced to focus more on my grad school studies & spending time with my family than spending quality time with my sewing machine. I've been taking a double load of classes every semester in an effort to finish grad school as fast as humanly possible...which has taken up quite a lot of time in the day during which I usually would be sewing. This little break from sewing has made me think about what really matters in life. I've been loving the chance I've had the past few months to soak up some quality time with my husband while he has the time on the weekends and evenings. Since residency will start soon, I have to take advantage of all the free time possible! We've managed to get away from everything for a little while -- whether it was to the sunny beaches of Florida or the ski slopes of West Virginia and just enjoy being together.

I am a huge goal setter, and I get into the whole New Years Resolution thing. However, this year I am trying to take it slow, and just live in the moment, so I tried to restrain my resolution/goal setting tendencies back in January. So while there are tons of things I would like to get accomplished this year I have decided to just focus on being happy and making memories. So if as I sit down to my sewing machine to finally finish a project and my husband randomly asks if I want to go camping, the answer will be yes and sewing will get put on hold. With that said, however, sewing does make me extremely happy and I foresee much more time spent in my studio in the near future.

Before I step foot in my studio today though, I think I will venture outside and play in the snow.

So, what makes you happy?

11.08.2013

Simple & Modern Baby Quilt Tutorial

Hopeful Threads

This month, Kristy at Hopeful Threads and my lovely friend Melissa from SewBitterSweet Designs are teaming up to run a baby love drive of quilts and blankets to be delivered to the local Children's Hospital NICU & PICU. This is a cause that is very dear to my heart as I have spent countless hours in a Children's Hospital during my lifetime. It can be scary to be in a place with loud machines, needles and strangers walking in and out of your room on a continual basis. Providing a small quilt for these patients not only provides comfort and some sense of normalcy to an awful situation for the children, but also comforts the family as well. This token of love gives the patients & their families strength they need to deal with their medical problems.

Anyway, as part of this drive I have written a very easy and modern baby quilt tutorial that measures at 44x44 which is perfect for the PICU and can easily be altered to a smaller size for the NICU. Even if you choose not to follow my pattern, I hope that you take a few hours out of your schedule this month and make a handmade blanket for the children who have to spend their holidays in the hospital instead of playing at home with their families and friends.

--


Supplies:

2/3 yard light peach fabric
1 yard dark peach fabric
3/4 yard light gray fabric
3/4 yard dark gray fabric 

Cutting Instructions:

From light peach fabric:
(3) strips 1.5" x width of fabric 
(2) squares 5.75" x 5.75"

From dark peach fabric:
(3) strips 1.5" x width of fabric 
(3) squares 5.75" x 5.75"

Instructions

1. Sew 6 strips of fabric together lengthwise, alternating between light and dark peach. Be sure to press with seams open. Cut into (5) 5.75" x 5.75" squares.


2. Make half square triangles by placing 1 solid piece of light peach fabric & 1 striped square on top of each other right sides together. Draw a line diagonally down the middle of the peach square & sew 1/4" on both side of the lines. Cut on the drawn line.


3. Press each square. Repeat for all of solid squares.


4. Assemble squares in groups of four as shown & sew.


5. Sew blocks together as shown.


6. Place borders. Be creative -- this is an excellent opportunity to use your scraps and make the quilt to whatever size you so desire - improv is the name of the game! 


7. Quilt & bind as desired.


Viola! Finished quilt in under 2 hours!


10.05.2013

Update via Instagram


Do you instagram? If so, I'd love to follow you. I find it is a fun and quick way to stay updated with our friends and stay connected with the sewing community. Follow me on instagram @PurplePandaQuilts

8.06.2013

Studying in a box & other things

I apologize for my absence on this lovely blog but my summer semester is coming to an end and I have been quite busy studying for finals & writing research papers.


I am so focused on my work that I even study in a box while my husband lovingly puts together a new chair for me to use in the office. Surprisingly, it was quite comfortable and I had everything I needed for a successful study session: snacks, water, pillows, sticky notes, books (lots of books) & colorful pens.


I am hoping to finish everything soon and be able to have some time to sew & share all the new projects I have been working on. In the meantime, here is a picture of some fabric I ordered the other day while on a study break...I couldn't pass up Brenda's awesome golden ticket deal over at Pink Castle Fabrics. There are so many fun collections coming out, I think I will reward myself with another purchase once I finish up the semester...


what fabric line are you currently most excited about?

7.26.2013

Fat Quarter Friday


My LQS had a fantastic sale on fat quarters this week, so of course I had to go pay them a visit. I came back with a nice little stack of fat quarters and I must say that I am extremely happy with my purchases. I love text prints so this Sweetwater print on top was a nice find. And of course, I couldn't go wrong with some comma fabric and a few grays & blues to round out my stash.

I don't normally buy fat quarters, and instead prefer to buy by the half yard. I find this gives me enough to do a variety of projects. Or if I am buying for a specific project I get just what I need (unless I happen to L-O-V-E the fabric then I buy more for my stash).

How do you prefer to buy your fabric?

7.23.2013

Pixelated Peace Pillow Template!

Hi friends! I have been asked by many people to share my letter template for the Pixelated Peace Pillow. You can find the pattern below. I hope you have fun making your pillows & would love it if you could please post pictures of your completed projects on the PurplePandaQuilts flickr page. 


Without further ado...here's the template

Click here for the template!

7.22.2013

Quilt as you go

There is something satisfying about quilting as you go. It is quite gratifying - you get the beautiful straight line quilting without having to wrestle your quilt through the sewing machine.


To be fair, my experience with this type of thing is somewhat limited. I like to make quilts with all sorts of designs, not just log cabins, but after making these blocks for the do.good stitches bee I almost couldn't stop. If only I didn't have school I would've made them all day long!


This is like instant gratification. Or at least almost instant.

7.19.2013

Low Volume Stars!

Last month for the do.good stitches bee, we were asked to make wonky stars in bright colors with low volume prints for the background. I was so excited to make this block -- I LOVE low volume prints. Of course I don't have very many in my stash at the moment but that was okay since it gave me a chance to visit my local quilt shop where I picked up these beauties:


I am especially fond of the prints from the architextures line (2nd & 4th from the bottom) as well as my sparkly one on the bottom. With these new beauties in hand, I set to work on my wonky stars right away. 


I love how they turned out and think a quilt with bright bold stars and low volume prints needs to be in my future.


7.18.2013

Market Tote!

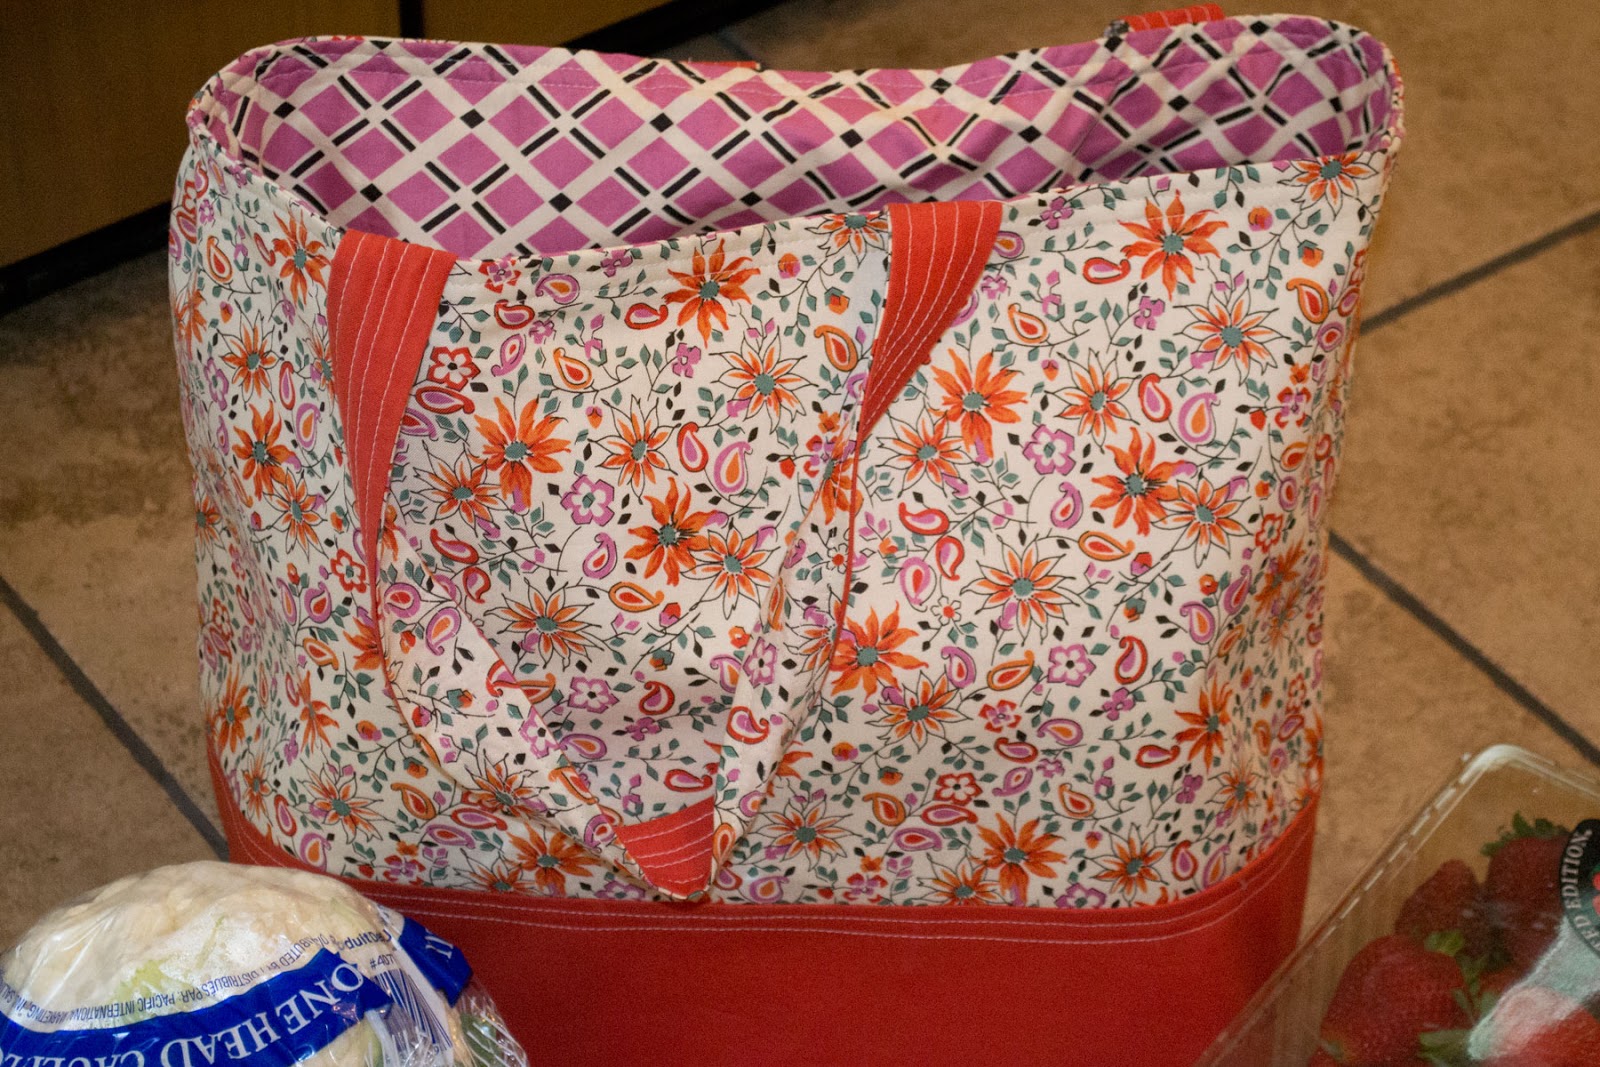
Awhile back I participated in this fun swap involving reusable grocery bags. After scouring the internet for tutorials on how to make a reusable tote, I came across this wonderful Market Tote Tutorial over at Bijou Lovely. I highly recommend this tutorial - it is easy to follow and it did not take very long to make this bag at all. I love the fact that it can stand on it's own and is super durable. Since my partner is a fan of orange I used a DS flower fabric for the outside with a coordinating print for the inside. Of course I could not resist adding a solid so I finally settled on a Kona solid for the handles and bottom. I am so glad that my partner likes it!


Do you have a go-to quick bag tutorial that you use a lot? Share it in the comments below!

7.17.2013

Tutorial: Pixelated Peace Pillow

Happy Christmas in July! Welcome to my stop on the Christmas in July blog hop & sewing challenge hosted by Christen from Love by Hand. All the details about the Sewing Challenge can be found here.


For this challenge, Chrissy from Sew Lux Fabrics sent me this lovely fat quarter bundle of Winter's Lane, which is 10% off right now, no coupon needed!


I LOVE this line, it is so perfect for the holidays! The reds are perfect shade of red and the prints are holiday without screaming holiday. I think that this line is perfect for home decor and my first thought went to make some holidays pillows.

So without further ado, I give you my pixelated peace pillow project!


Supplies:

66 1.5x1.5 inch squares from assorted winters lane fabrics
1/2 yard of pillow backing/front (I used essex linen from my stash but highly suggest this print if you don't have any on hand)
1/2 yard fusible interfacing

Directions:

1. Cut the following from winter's lane: (66) 1.5" x 1.5" squares (1) 12.5" x 5" piece for letters. From fusible web cut (1) 12.5" x 5" piece. From the background fabric cut (1) 5.5" x 15.5" and (11) strips 1.5"by various lengths. See the below diagram for all the cutting info.

all units are in inches

2. Layout your squares in a layout according to the diagram above. Sew each row together.


3. Next, sew each row together. Then sew the 5.5" x 15.5" piece of linen to the bottom of the patchwork piece. Then trim to 15" square.


4. Now we are going to applique the words onto the pillow top. First, using your word-processor choose a font and print out a stencil. I made my letters approximately 4.5" tall. If there is interest I can post a pdf of my template. ETA: Here is a link to the template


5. Cut out the letters and then iron the fusible webbing to the 5.5" x 12.5" piece of fabric.


6. Trace the letters onto the paper side of the fusible web. IMPORTANT NOTE: Be sure to flip over your letters & trace them so they are a mirror image. This is important because the right side of the fabric (in this case red) needs to be the front.


7. Lay the letters onto the pillow front and then iron them on one by one. Make sure you leave at least a quarter inch seam allowance on all sides.


8. Applique the letters in your preferred method. I use a small zig zag stitch and use the needle down function on my sewing machine.


9. Voila! Your pillow top is finished.


10. Make the back of the pillow in your preferred way & then insert your pillow form. I used a 14 x 14 inch pillow form. If you have any questions, I can post how I did my no zipper back.


I hope that you enjoy this tutorial! I had plenty of fabric left over from my bundle and could easily make 2 more.

7.02.2013

Christmas in July!

Christmas is my favorite holiday, so when Christen over at Love by Hand asked if I would be interested in participating in her Christmas in July blog hop it was a no brainer. I mean, why wait 'til December to start celebrating the best time of the year when you can celebrate it now?!


Seriously though here's the 411 on this awesome event:

Each week, two bloggers will use the same 8 FQs to share their own unique project tutorial to inspire you to get sewing.  The blog hop kicks off July 8!


July 8 – Christen, Love by Hand
July 10 – Sarah, Stitching & Bacon
July 15 – Kelly, Kelby Sews
July 17 – Lyanna, Purple Panda Quilts
July 22 – Tessa, The Sewing Chick
July 24 – Kristen, KD Quilts


Then, during the month of July, start and finish your own holiday sewing project to link up July 26-30 for a chance to win one of three amazing prize packs from these amazing sponsors!


Grand Prize

$40 gift certificate to Sew Lux Fabric
Pearle Cotton Sampler from Sew Lux Fabric
3 Sewing Prints from Pen & Paint
Paloma FQ bundle from Dear Stella
1 pattern from LBG Studio

Second Prize

FQ Bundle from Michael Miller
2 sewing prints from Pen & Paint
Pearle Cotton Sampler from Sew Lux Fabric
1 pattern from LBG Studio

Third Prize

Havana FQ Bundle from Monaluna
1 sewing print from Pen & Paint
Pearle Cotton Sampler from Sew Lux Fabric


Winners will be selected by the judges, which will consist of all of the bloggers plus Chrissy from Sew Lux Fabric. Entries will close on Tuesday, July 30 and winners will be announced on Friday, August 1. 


How To Enter: The Details: Enter any project you’ve made during July to get ahead of your holiday sewing. It can be anything (not just the projects we post here) and can include any fabric – it doesn’t have to be Christmas fabrics or colors.

Starting July 26, you'll be able to link up your entry at Love By Hand. You'll have until 10:00 PM EST on July 30 to add your entry – one entry per person. Link a new post from your blog, your Flickr account or your Threadbias account – you don’t have to have a blog to enter!