Hey gang, here is a super easy tutorial for a stylish carrying case for you Kindle. Even though the directions might seem complicated, I started and completed this project in under an hour.
Note: My case is for the 6” Kindle.
Materials:
1 7”zipper (I used a bigger one and cut it down to size)
1 decorative strip of fabric 1.5” x 9” (or a bunch of scraps that are at least 1.5" wide)
2 pieces of fusible fleece 7” x 9”
2 pieces of lining fabric 7” x 9”
1 4.5” x 9” piece of fabric for front
1 2.5” x 9 piece of fabric for front
1 7” x 9” piece of fabric for back
1 2.5” x 7” piece of fabric for loop
Embroidery floss, needle & embroidery hoop
Instructions:
1. Cut and iron all pieces for your project.
2. If using scraps for the decorative fabric
& loop, sew the scraps into 2 strips, one 2.5” x 7” for the loop and one
1.5” x 9” for the front.
3. Piece together the front of the case by sewing the decorative
strip of fabric to the two other front fabric pieces. Trim to 7" x 9".
4. Time to embroider. Measure approximately one inch to the right of the decorative strip and 4 inches from the bottom. Lightly write, with pencil, the saying “just read.” I found it helpful to use a ruler to make sure it was straight.
5. Using 2 strands of embroidery floss, back stitch over your pencil marks. Be sure to knot your thread on the back when finishing to avoid it coming loose in the future.
6. Fuse the front piece to a piece of fusible fleece, right side up. Repeat with the back.
7. Make the Loop. With right side of fabric facing down, iron and fold the top and bottom of strip in a quarter of an inch. I found it helpful to use starch during this step.
10. Take the zipper and make several stitches very close
together across the closed zipper teeth at 7” from the top end of the zipper
tape. To do this set your machine at the widest zigzag stitch it has and a
length of. 01mm. Turn the hand wheel one full rotation to make sure the needle
will clear the zipper teeth. Repeat multiple times. This will create a new stop
for the zipper, allowing you to cut off the excess.
11. Lay the front fabric right side up and place the
zipper, face down, on top of it, lining up the edges. Next lay a piece of
lining on top of the zipper, right side down. Essentially you are creating a
sandwich with the zipper in the middle.
12. Pin and stitch together close to the teeth. I highly
recommend using a zipper foot. Turn the 2 fabric pieces so that they are wrong sides
together. Press both edges away from the zipper.
13. Lay the backing piece right side up, next place the
piece you just sewed with the zipper on top (thus the 2 outside pieces will be
right sides together, with the first lining on top). Line up the edge of the zipper. Now place the
second piece of lining on top, right side up.
15. Pin and stitch
together close to the teeth. Again, I recommend using a zipper foot. Open the zipper at least halfway so you can turn it later.
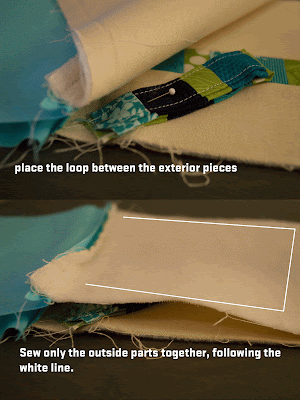
16. Next, we are going to stitch the sides. Insert the loop by sandwiching it between the
2 outside fabric pieces and place it at a downward angle. Pin in place. Now you
are going to stitch along the sides and the bottom, with a quarter inch seam.
Important Note: Don’t stitch the lining that will be in the next step.
17. Sew the lining. Be sure to unzip the entire zipper!! Stitch
along the sides and bottom of the lining, leaving a hole in the bottom of the
lining for turning. Turn the lining right side out. Fold the bottom unsewn part under a quarter
inch and stitch along the folded edge.
This post is part of the Remember September Project at Hopeful Threads & Sew BitterSweet Designs.


9 comments:
Exactly what I was looking for. How snug is your kindle in it? I want to make one for my mom's kindle touch... maybe I should increase your dims just a bit for it... ?
This looks so great! Thank you so much! Love the added touch of the stitching too! :)
This is fantastic! Thank you so much!
Thanks for the wonderful tutorial! Love the stitching! :)
love this! i need to make one!
Thanks for sharing
Great tutorial! Love the embroidery touch!
Love this tutorial and the cursive!!!!!!!!!
WOW! You make it look so easy! I think I'll just give this a try tomorrow!! Thanks. ~karen
Post a Comment