11.15.2011

Stockings for Kids Tutorial Tuesday: Photo Stocking

Hey friends! We are well into November (any one else stressed that Thanksgiving is next week?) and this week's tutorial is courtesy of Sarah from So Sarah Sews. She has a great blog with some excellent tutorials that should be on everyone's must read/must try list. If you like her stocking tutorial be sure to go show her some love on her blog.

I really like her idea of a photo holder for these stockings. A lot of the kids in the program only have a photo or two of their birth parents and would love the chance to get to place it in their stocking during the holiday season. I wish I had thought of this! =)

Check back later this week for info about entering the giveaways from the stocking for kids sponsors.

Photo Stocking Tutorial
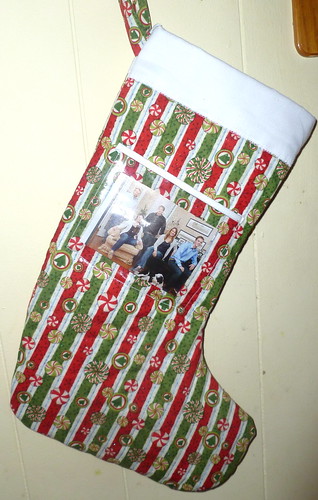

Stocking for Foster Children 

I have a little tutorial on how to add a picture pocket to the stocking that I'm going to share with you today.

Start with a piece of clear plastic bought from the remnant bin at your local quilt shop. You can make yours whatever size you want.  A picture is usually 3.5 x 5 inches or 4 x 6, but many pictures can be cut down to a smaller size.

 Then take a piece of white (or whatever color you want) and make sure it is about 1/2 an inch longer than the top of your plastic piece.  The width of the white should be one inch.

You will fold the one inch piece of white in half, like the picture shows, then iron.  This will give you a good crease.


Use the crease that you just made as a guide.  You will fold both sides of the crease into itself.  See the picture below for an idea of what I mean.  Line up the edge of the white to the center crease on both sides.  Then press with an iron.


Once your piece of fabric looks like the picture above, fold it in half again.  So now it is folded on the original crease that you made.  And both sides of the fabric are folded so that they look like binding.


Next, place the plastic piece in between the white fold.  This will be the top of the picture pocket.


This is what it should look like so far.


Next, place it where you want it.  Pin it, and on the end of the white strip, where you have raw edges, just fold them over and pin under.   You will not be able to see the raw edges if you do it this way.


Sew from the right end of the white strip, down to the bottom, turn your fabric.  Go along the bottom, turn again, then go up to the left end of the white strip and back stitch to secure.  DO NOT sew along the white strip again.  That does not get sewn onto the stocking. And that's it!  Then continue with sewing your two sides of the stocking together.  Make sure you do not try to add the pocket after the stocking is sewn together...you'll be miserable ripping seams!

 I'm so glad Lyanna is putting in so much time and effort into making this Christmas special for the children in foster care that she works with.  And thank you for helping!

11.12.2011

Saturday Morning Sewing

I am spending the morning trimming down some squares to 4.5 inches...not too bad except I have 300 to trim.

How are you spending your saturday morning?

11.08.2011

Stockings for Kids Tutorial Tuesday: Reversible Stocking with Pockets

Todays stocking tutorial is courtesy of the ever so talented Melissa who blogs over at Sew BitterSweet Designs.  She has cleverly come up with a reversible stocking -- which is perfect for those of us (like myself) who are incapable of making a decision about what fabric to use on their projects.

I also want to take a second to say thank you to everyone who has sent in stockings so far. You guys rock and I seriously have been blown away by your generosity. 

So without further ado -- here is her tutorial!

100% Reversible Stocking with Pockets


Materials (enough to make 2!): 
- You will also need an old stocking or use Lyanna's pattern.
- 1 yard each of flannel (2 different designs)
- 1.5 yards of Pellon Fusible Fleece


Instructions:

1. Fold your PFF in half lengthwise and then in half again (per photograph). Place old stocking on top and cut around it using rotary cutter. You will end up with 2 sets of fusible stockings.


2. Next cut out stocking from flannel - fold flannel in half width wise. Place one of your PFF stockings on top, cut around with 1/4" extra on all sides - You will end up with 4 flannel stockings total.


3. You will also need to cut pockets out of the flannel and out of the PFF - Eyeball these based on the size of your pocket. Make the PFF pockets smaller than your flannel by 1/4". Cut 4 from the PFF and 4 from each of the flannels.


4. Fuse your PFF following the directions included with the PFF to the flannel (note it may take longer than usual).


5. Make your pockets. My pockets are also reversible so I layered one red square with one of the green squares that was fused with PFF. Sew 1/4" around three sides - leaving BOTTOM open, clip your corners


6. Make 4 pockets - Turn them right side out and press. Sew to stockings. Place right side up on stocking to determine placement, flip down and pin in place, using 1/4" seam sew across opening of pocket.


7. Flip the pocket up, pin in place and top stitch down 1/8" from edges.


8. Do this on all 4 stockings. Next sew the stockings together - place red stockings right sides together and green stockings right sides together. Sew around both stockings with 1/4" seam - leave tops open.


9. Next, make your handle. I cut a strip from each flannel - 1.5" x 8", and sewed them into a tube - turn tube right side out and attach to one of the stockings.


10. Time to make these 2 stockings into 1! With the green stocking inside out and the red stocking right side out. Place red stocking inside green stocking - pin side seams and around, leave 4 inch opening so you can turn stockings. Sew with 1/4" seam.


11. Reach inside the opening and pull red stocking out. Then pull green stocking right side out and place back inside the red stocking. Pin the opening closed and topstitch around the top of the stocking using an 1/8" seam. This will close the opening you used to turn the stocking and it will give it a nice finished look.


Congratulations! You have just made 2 stockings in one - and you should have enough fabric to make another reversible stocking too!


Happy stocking making!


11.07.2011